[Airflow] 간단한 예제로 시작해보기
설치를 마쳤다면 간단한 예제를 바로 실행해볼 수 있습니다.
에어플로우 실행을 위해서 쉘 명령어 두 개면 끝입니다.
airflow webserver
airflow scheduler
# 로그가 계속 뜨기 때문에 백그라운드 실행을 추천합니다.
# scheduler를 실행하지 않아도 예제에 대한 test는 동작합니다.
airflow webserver의 기본 포트는 8080입니다. 이제 http://localhost:8080 으로 접속해봅시다. 접속하면 다음과 같은 페이지를 만날 수 있습니다.

만든게 없는데 뭐가 많습니다. airflow.cfg에서 얘들을 안보이게 할 수 있습니다.
아직 우리의 dags 폴더에는 아무것도 없지만, 기본 예제들을 확인할 수 있습니다. 그럼 tutorial이란 이름의 DAG를 구경해봅시다. 클릭하면 기본적으로 Tree View가 보여지며, Graph View, Duration, …, code 등등이 있는 것을 볼 수 있습니다. Code를 클릭하면 아래와 같은 DAG 파일의 파이썬 스크립트를 볼 수 있습니다.
DAG Script
지금은 느낌만 보시면 됩니다.
from datetime import timedelta
import airflow
from airflow import DAG
from airflow.operators.bash_operator import BashOperator

default_args = {
    'owner': 'airflow',
    'depends_on_past': False,
    'start_date': airflow.utils.dates.days_ago(2),
    'email': ['airflow@example.com'],
    'email_on_failure': False,
    'email_on_retry': False,
    'retries': 1,
    'retry_delay': timedelta(minutes=5),
    # 'queue': 'bash_queue',
    # 'pool': 'backfill',
    # 'priority_weight': 10,
    # 'end_date': datetime(2016, 1, 1),
    # 'wait_for_downstream': False,
    # 'dag': dag,
    # 'adhoc':False,
    # 'sla': timedelta(hours=2),
    # 'execution_timeout': timedelta(seconds=300),
    # 'on_failure_callback': some_function,
    # 'on_success_callback': some_other_function,
    # 'on_retry_callback': another_function,
    # 'trigger_rule': u'all_success'
}
관련 라이브러리들을 불러오고 DAG에 전달할 arguments를 정의합니다. 소유주, 작업 시작일, 재시도 횟수 등 다양한 옵션을 설정할 수 있습니다.
Dag
dag = DAG(
    'tutorial',
    default_args=default_args,
    description='A simple tutorial DAG',
    schedule_interval=timedelta(days=1),
)
작업의 중심이 되는 dag를 설정합니다. 위에서 정의한 arguments와 함께 dag_id, description, interval 등을 정해줍니다.
Task
t1 = BashOperator(
    task_id='print_date',
    bash_command='date',
    dag=dag,
)
t1 변수에 할당한 print_date라는 위 task는 사용자의 bash에 date 명령을 내리는 작업을 수행합니다. task_id와 함께 방금 정의한 dag를 인자로 전달합니다.
Doc
t1.doc_md = """\
#### Task Documentation
You can document your task using the attributes `doc_md` (markdown),
`doc` (plain text), `doc_rst`, `doc_json`, `doc_yaml` which gets
rendered in the UI's Task Instance Details page.

"""
dag.doc_md = __doc__
위와 같이 task, dag에 doc을 써놓을 수 있습니다.
- Graph View 상단에 위치한 dag doc을 확인할 수 있습니다. link
- task doc은 Graph View > Task 클릭 > Task Instance Details
정기 작업이라면 문서화해놓는 것이 좋겠죠? 너 나 우리 모두를 위해…
And so on
t2 = BashOperator(
    task_id='sleep',
    depends_on_past=False,
    bash_command='sleep 5',
    dag=dag,
)

templated_command = """

{% for i in range(5) %}
    echo "{{ ds }}"
    echo "{{ macros.ds_add(ds, 7)}}"
    echo "{{ params.my_param }}"
{% endfor %}

"""

t3 = BashOperator(
    task_id='templated',
    depends_on_past=False,
    bash_command=templated_command,
    params={'my_param': 'Parameter I passed in'},
    dag=dag,
)
Jinja template을 이용할 수 있습니다. 뒤에서 자세히 다루겠습니다.
dependencies
t1 >> [t2, t3]
작업의 순서를 표현합니다. t1 작업이 끝난 후에 t2, t3 작업을 수행하라는 의미입니다. 여러 줄로도 표현할 수 있습니다.
Test
python script 자체를 실행하여 테스트할 수 있지만, 다음과 같이 task 단위로도 테스트가 가능합니다.
# airflow test dag_id task_id execution_date
# 위 예제의 경우,
airflow test tutorial print_date 2019-01-01
결과
(airflow) mk@mk-13ZD940-GX30K:~/airflow$ airflow test tutorial print_date 2019-01-01
[2019-03-01 13:26:33,044] {__init__.py:51} INFO - Using executor SequentialExecutor
[2019-03-01 13:26:33,455] {models.py:273} INFO - Filling up the DagBag from /home/mk/airflow/dags
[2019-03-01 13:26:33,553] {models.py:1359} INFO - Dependencies all met for <TaskInstance: tutorial.print_date 2019-01-01T00:00:00+00:00 [None]>
[2019-03-01 13:26:33,557] {models.py:1359} INFO - Dependencies all met for <TaskInstance: tutorial.print_date 2019-01-01T00:00:00+00:00 [None]>
[2019-03-01 13:26:33,557] {models.py:1571} INFO -
--------------------------------------------------------------------------------
Starting attempt 1 of 2
--------------------------------------------------------------------------------

[2019-03-01 13:26:33,558] {models.py:1593} INFO - Executing <Task(BashOperator): print_date> on 2019-01-01T00:00:00+00:00
[2019-03-01 13:26:33,578] {bash_operator.py:77} INFO - Tmp dir root location:
 /tmp
[2019-03-01 13:26:33,579] {bash_operator.py:86} INFO - Exporting the following env vars:
AIRFLOW_CTX_DAG_ID=tutorial
AIRFLOW_CTX_TASK_ID=print_date
AIRFLOW_CTX_EXECUTION_DATE=2019-01-01T00:00:00+00:00
[2019-03-01 13:26:33,580] {bash_operator.py:100} INFO - Temporary script location: /tmp/airflowtmpe648lfbs/print_datekhnigzkr
[2019-03-01 13:26:33,580] {bash_operator.py:110} INFO - Running command: date
[2019-03-01 13:26:33,588] {bash_operator.py:119} INFO - Output:
[2019-03-01 13:26:33,592] {bash_operator.py:123} INFO - 2019. 03. 01. (금) 13:26:33 KST
[2019-03-01 13:26:33,593] {bash_operator.py:127} INFO - Command exited with return code 0
정상적으로 실행된 것을 확인할 수 있습니다. 마지막 return code가 0이면 정상 종료입니다.
과거 시간으로는 동작하지만, 미래 시간대로 설정하면 동작하지 않습니다. airflow에서는 한국 시간보다 9시간 느린 UTC 시간 기준을 이용합니다.
실행
test를 통해 dag 동작을 확인했다면 이제 스케쥴에 맞춰 실행을 시켜봅시다. web에서 DAG 상태를 On으로 바꿔주기만 하면 됩니다.
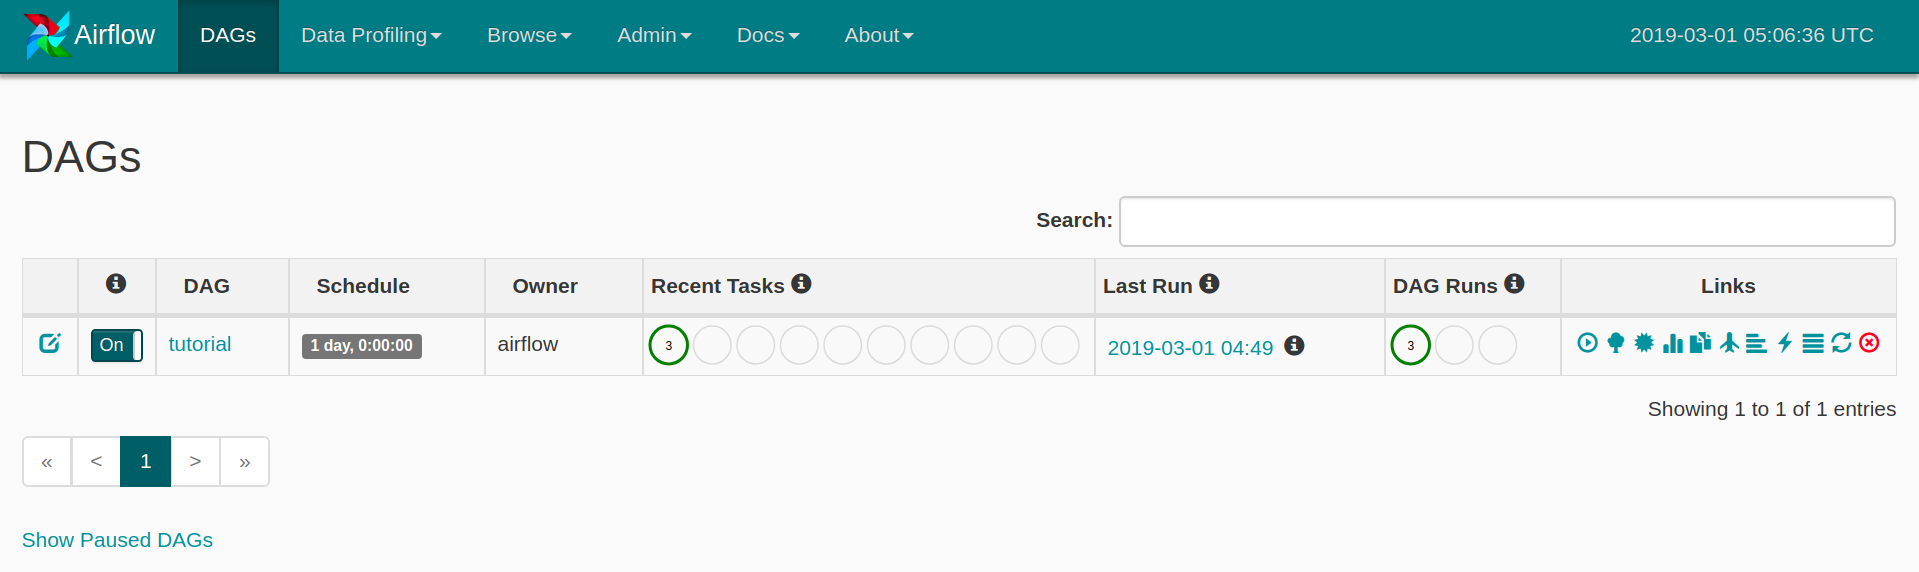 좌측 하단 버튼으로 Paused DAGs를 가릴 수 있습니다.
이미 시작일 이후 쌓여있던 작업들이 완료된 후의 모습입니다.
이후에도 tutorial DAG는 매일 0시 0분 0초에 정의된 작업을 할 것입니다.
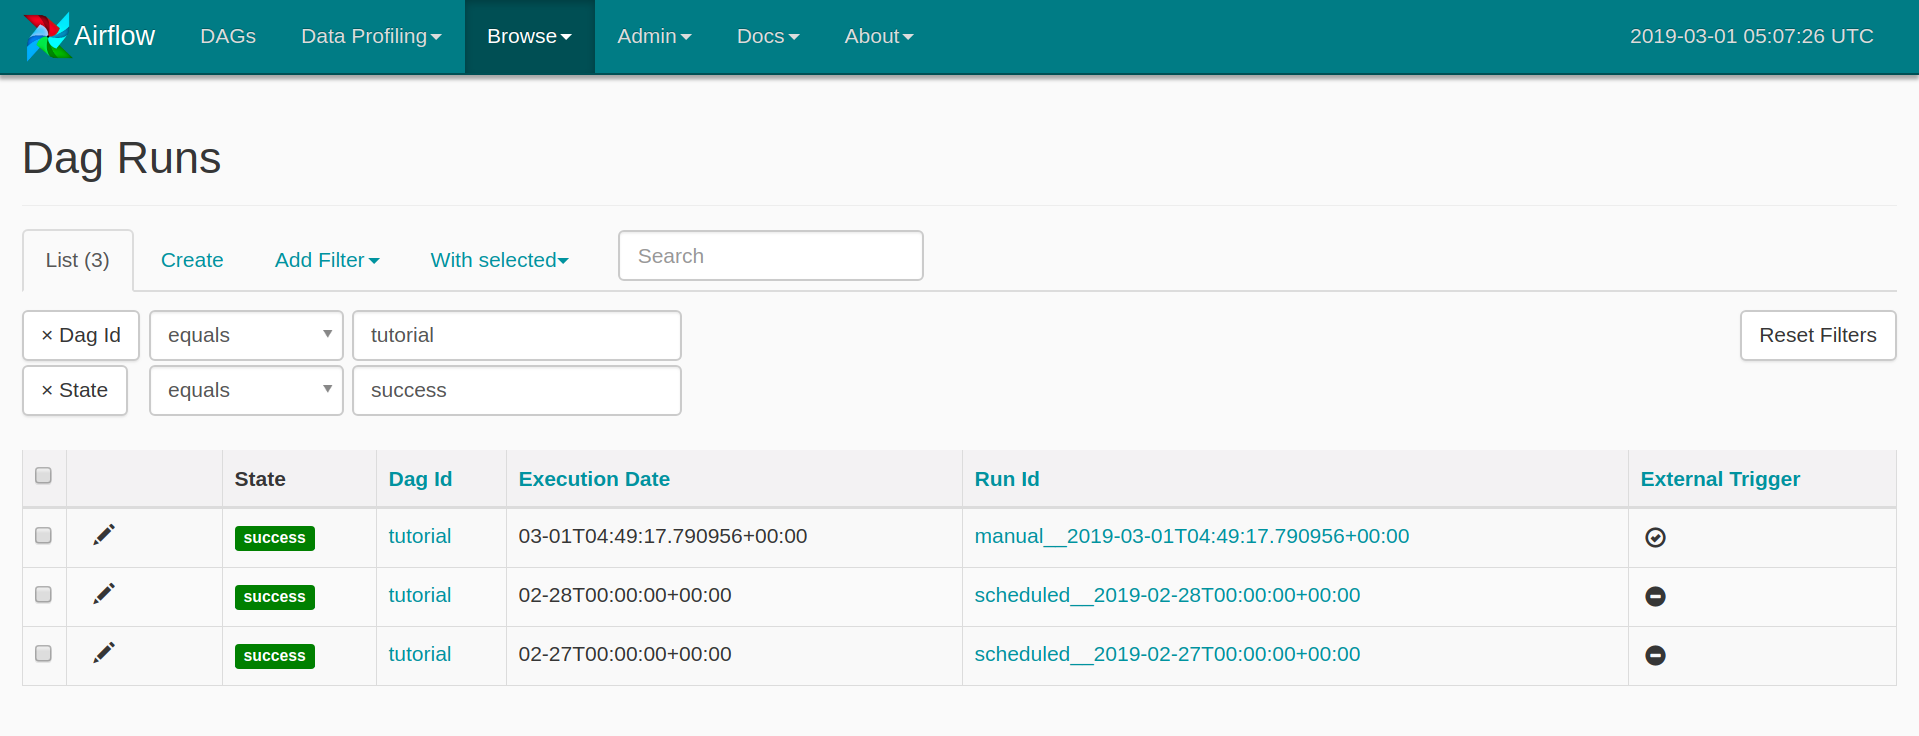 스크린 샷의 DAG runs가 3개인 이유는 manual로 한번 실행했기 때문입니다. Run Id의 앞부분으로 구분이 가능합니다.
- 시작일이 작성일 기준(3월 1일) 2일 전(2월 27일)으로 설정되어있으니 (default_args 참조)
2018-02-27,2018-02-282일치의 작업이 수행되었고,- 오늘(3월 1일)치 작업은 3월 2일 0시 0분(UTC기준)에 수행될 것입니다.
여기서 의문이 생기지 않나요? 오늘(3월 1일) 0시 0분은 이미 지났는데 왜 내일해?
그 이유는 다음과 같습니다.
Note that if you run a DAG on a schedule_interval of one day, the run stamped 2016-01-01 will be trigger soon after 2016-01-01T23:59. In other words, the job instance is started once the period it covers has ended.
스케쥴(Run)은 해당 기간이 끝난 이후에 시작됩니다. 일 단위로 수행되는 tutorial DAG의 기간은 0시 0분부터 23시 59분까지가 한 기간이고, 3월 1일이라는 기간이 아직 끝나지 않았기 때문에 작업이 진행되지 않는 것입니다.
:star: 아직 느낌이 잘 오지 않을 수 있습니다. 예제로 가볍게 훑어봤으니 dag와 task, execution_date 등 개념에 대해 파악해봅시다.
Leave a comment